what I do

what I do

Monday, August 22, 2011

Packing up


My youngest daughter is heading back to school today to begin her senior year ... seriously how did that happen so fast?!?  Each year she has moved to a new apartment and each year after summer is over I have driven her back up to school and helped her get set up in her new place. But this year we moved her at the beginning of summer. Remember this post about moving everything from the old place to the new one with the little convertible car?  


So instead of me driving her back to school, she is flying. The only problem is we didn't account for ALL the stuff she has to take up. Since she was home all summer (working at that fabulous internship in the gallery in Santa Monica) now she has a ton of clothes to take back up. And she couldn't fit it all in the one suitcase the airlines allow. She thought about just paying extra and taking two suitcases. But those plus a carry-on and a backpack was a lot to handle. So we opted for these:


They actually worked quite well. Have you ever tried them? They are pretty amazing. It enabled her to fit everything into one large suitcase. One very heavy suitcase, I might add, but paying for the extra weight seemed like a better solution than paying for an extra suitcase and having to navigate the trek back to school with too many bags to handle. And with the price of gas these days, flying (even with the extra baggage fee) was less expensive than driving anyway. I am crossing my fingers that those seals stay intact. 

Happy Monday everyone!

Sunday, August 21, 2011

This is for you, my friend:

from {here} via {here}


Psalm 13
Amplified Bible

To the Chief Musician. A Psalm of David.
   1HOW LONG will You forget me, O Lord? Forever? How long will You hide Your face from me?

     2How long must I lay up cares within me and have sorrow in my heart day after day? How long shall my enemy exalt himself over me?

    3Consider and answer me, O Lord my God; lighten the eyes [of my faith to behold Your face in the pitchlike darkness], lest I sleep the sleep of death,

    4Lest my enemy say, I have prevailed over him, and those that trouble me rejoice when I am shaken.

     5But I have trusted, leaned on, and been confident in Your mercy and loving-kindness; my heart shall rejoice and be in high spirits in Your salvation.

     6I will sing to the Lord, because He has dealt bountifully with me.

Saturday, August 20, 2011

Harbour house reno: part one

I have been working on a house renovation for the last couple of months and it is almost finished. This was a big week. The carpet was installed, the painting finished, the cabinets completed and the new furniture on site. As any project there are a few adjustments to be made but it was ready enough to start bringing in a few pieces today. I started with the new desk area.


One of the things the client asked for was an updated kitchen. They wanted a new refrigerator and the one they wanted required the cabinets to be readjusted (the new refrigerator was larger), a new sink (she had her heart set on a farmhouse sink) and she wanted new countertops. She also wanted the dated wallpaper to be removed and the existing ceiling lighting updated. And she needed a desk area; nothing big but a place where she could use her laptop. There was not a lot of room and the only place we could use was where she currently kept her microwave.

Desk area before

I thought about doing something built-in and even considered cutting into the wall behind the desk to borrow space from the closet on the other side of the wall. I also thought about doing something like this:


I liked the idea of a desk on casters that they could use for a serving cart or bar area when entertaining. After all my research, I ultimately ended up with a simple secretary / desk from Pottery Barn. I couldn't  resist it; it fit perfectly in the space and had everything the client needed. 

New desk area


To make the desk area personal I brought in elements that fit their lifestyle and personality. I brought in some nautical desktop items, and a bit a whimsey (the ceramic 'plastic' cup as a pencil holder) and custom photography photoshopped to match the color scheme of the new kitchen / dining area. My sister, the photographer showed me some photos she had taken of the beach and we came up with three that were just what I wanted. We adjusted the color (she did while I watched) and then I framed them in simple frames to match the desk.


I added a bulletin board and put a few quotes on it for her for fun.


I love the way the desk area turned out but putting the desk in that space left the microwave without a place to go. So I took some wasted space by the back kitchen door and had a cabinet built to give it a permanent home.

Back door area before


Back door area / new home for the microwave


Wait till you see what we did to the ceilings!

Thursday, August 18, 2011

More baby shower details

Want to see more photos of the baby shower? Check out my sister's blog, Prizler Photoblog. Click here to see her photos and re-cap of the big day.

Tuesday, August 16, 2011

My daughter's baby shower

My sister, who is one of the most creative people I know, hosted a baby shower for my daughter Sunday and it was truly a gift of love. I only have a few photos to share so far but I couldn't resist posting a few!


She started by making the invitations from my other sister's (the illustrator) artwork and tweaked it to go with the colors of my daughter's nursery. 


The nursery colors

And then she made these for each guest to fill out:


A couple of days before the shower she decided to make a few tablecloths for the event. You know, as in just-whip-them-up like they were the most simple thing in the world to make.  It boggles my mind that she made them so effortlessly. They came out phenomenal and I can't wait to show you more.


Babies were everywhere!


She made a diaper cake like no other:


And even made some thank you notes for the mommy-to-be (you can read how she made them here):


My beautiful daughter

It was such a wonderful day and I cannot thank my sister enough! I can't wait to show you more!

Thursday, August 11, 2011

Nursery inspiration

I have nurseries on my mind for a couple of reasons. One, I am designing a nursery for a client ... and two, my daughter is having a baby next month. Both babies are girls and I have had more fun playing around with ideas for them. When I first started working on my client's nursery, all she told me was that she wanted a lot of pink. So I sent her an idea board to see what she thought. I based it on colors we had used in decorating her home previously and I thought she would probably want something modern and young.


I also sent her four nursery ideas to see which one resonated with her the most to try to get into her head a little bit. (All nursery images were found here).

45516258_X76jy7RU_c.jpg

20672727_1HOETqn4_c.jpg

59857802_P5UMkx9Q_c.jpg'

31962959_kUd8aKZd_c.jpg


She chose nursery number three. It turned out she preferred something much more soft and traditional. Having a starting place made it so much easier. This is what we came up with:


In contrast, my daughter wants her nursery to be much brighter and she is shying away from soft pink. Her inspiration was a vase of flowers that I had put in her sister's room where she stays while she is with us.


A client of mine gave us her beautiful Bellini crib that her three daughters had outgrown. We were thrilled. My painter offered to paint the crib the color my daughter chose, Tropical Teal 734 by Benjamin Moore.


We found a crib bumper at Pottery Barn Kids that was on sale that will bring in both the teal and the pink. Here is the inspiration board I made for her:


I can hardly wait to see both nurseries completed (and the sweet little girls to arrive!).

I Am a Child of God print, mobile, image of crib, Eames child's rocker

Wednesday, August 10, 2011

Framing memories & living room reveal

I have been working for months on a house that started out just being a "specify paint color" project (see previous post here). It quickly escalated into a full house renovation. We replaced all the wood flooring and carpet, replaced doors and windows, updated lighting and fireplaces, refinished cabinets, added new cabinets, put in new sinks and faucets, replaced counters and purchased a few rooms of new furniture. And that is just the first floor. It has been a long and somewhat slow process at times but last weekend we made great strides in seeing the fruits of our hard labor. Saturday was install day and my sister the photographer kindly came along to assist me in placing furniture, hanging artwork and most importantly restoring and framing family photographs. We still have a way to go and it is quite evident after studying the photos how much still needs to be done to bring the rooms into their full glory but we have come along way from where we started. I will be bringing in fabrics through window coverings and pillows to soften everything, placing lamps to add much needed lighting and also visual interest and of course incorporating some new accessories. But the 'bones' are there.


Before I blogged, I rarely took photographs of my work. I am learning through trial and error and also from reading wonderfully informative design blogs how to go about photographing rooms, especially before and after photos. You should take your before photos with the after photos in mind; taking both from the same angles. I didn't. You should also take your photographs during the daylight hours when you have plenty of natural light and you should never use a flash. 

We worked all day and finished around 8PM at night - whew! The sun had gone down and the room has no lighting yet. So hello flash. It was the best I could do. 

Here is the way the living room looked on my first visit:


The fireplace was large and too bulky for the room. It was also outdated and the client said she was never really all that happy with it. I wanted to get rid of the raised hearth to make more room for a conversation area. I did not like the way her sofa was so far away from the other chairs in the room. So we made a few changes. 

We took out the hearth and replaced it with 2x4" travertine 'tiles' and a limestone hearth and added a beautiful custom mantle. The newly painted walls, baseboards and carpet give the room a fresh new look.


The painted mantle set the stage for a few other changes ... We replaced the light oak entry doors (double doors) with a single door with a sidelight and painted the inside white and the outside a beautiful shade of dark blue. We also painted the previously all oak staircase. Although the client loved her oak, painting some of it white really brightened up the house. 

Updated staircase:


Here is the room before (to refresh your memory):


And here is the room now:


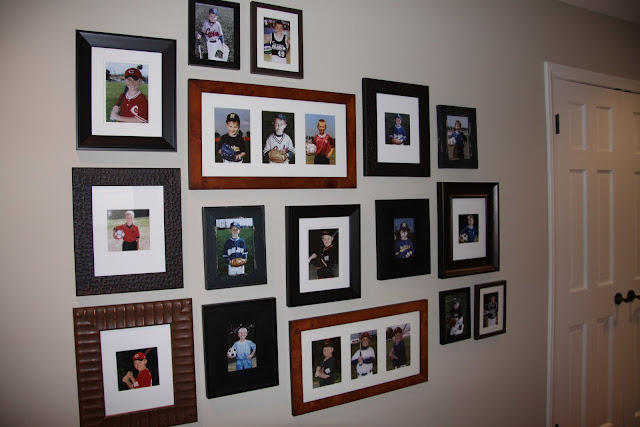
After we placed the furniture where we wanted it we went to work hanging artwork. In the downstairs hallway the client previously had some oak ledges that held her son's sports plaques. The kind that come with a small 2"x3" photo of your child and a group photo of the team put onto a wood plaque and covered with plexiglass. Her sons are grown now and the photos had faded. When we removed the ledges to paint she asked me about putting them back up. I suggested restoring the photos, enlarging them and putting them in nicer frames. She agreed. My sister worked her photoshop magic on the photos and enlarged them to fit in the frames that I had previously purchased. Then we placed the photos in the frames and arranged them the way I wanted them to be placed on the wall.


When I purchase frames to make an art wall, I place them the way I want while I am still at the store. I purposely select frames in different colors and styles to add interest. I try to buy more than I will need just in case. My preference is to put in black & white photos but for these photos the colors were important - they showed the team colors. 


Before I begin hanging the frames, I take a photo of them the way I want them to look. Then I take a few measurements; my width and height, and a how far apart they are in a few areas to give me direction. Then I find my center (both on the wall and the frame arrangement) and then start hanging. It is one of my favorite things to do!

© Prizler Photography

© Prizler Photography

While we were placing the client's things back into her living room we noticed that her family photos were framed in outdated frames and they were not up to the level of the new living room. So we went out and purchased some new frames and hung a beginning family wall over her piano and reframed a beautiful family group portrait.


Adding those personal touches is the most gratifying part of styling a room for me because it is what takes the room from "my vision" to "home" for the client.